Saturday, August 29, 2009

Up The Creek


The creek that runs across the end of the peninsula is getting more vegetation. this area will also have a dense forest cover between the creek and the tracks. It just takes so much time to make trees.

Bridge Installed


The bridge across the Saco river is finally installed, I cleaned all the track in the areas I have done scenery this last couple of weeks and then ran a train through to make sure all is still working. The train ran fine but my radio throttle seemed to be not functioning, changed battery and checked all the connections but it still would not transmit (or maybe the receiver does not receive)something to figure out next time I am home.

Rock Cut with Vegetation


The same rock cut as before, I have now added weeds, bushes and there is the start of the forest on the hillside to the left. The lichen on the left has not been coated with "leaves" like those on the right. Spray it with wet water, soak it with glue and add the color of your choice. I sprinkle from the top and then blow the ground foam onto the sides using a folded 3 x 5 card and a straw to blow it off the card onto the sides of the lichen.

Saturday, August 22, 2009

Rock Cut


This is the cut through the ridge line with rock out cropping. Hydro Cal rocks from rock molds were used then attached to the foundation with spackling compound. Blended with more spackling compound which was used with a lot of water on a brush to blend the rocks into the foundation. Last a series of washes with my dirty paint brush rinsing cup.

The Saco River is taking shape.


I am almost ready to pour the water here. Will finish the scenery and stuff around the bridge abutements and then install the bridge....then pour the river.

Trees are growing!


In my continuing effort to have the scene as you enter the room semi done, I have started populating the area with trees. Still need to make various conifers but will wait until the next time I am home.

Sunday, August 16, 2009

Basic Ground Cover


A view of the peninsula from the entry way. I couldn't stand the bare earth look and spent some time the last day before leaving to Georgia this spring adding basic ground cover. I ballasted the track since returning.

Basic ground cover


The bridge painted and set in place, I will not attach it to the track until the scenery in this area is completed to the basic ground cover level.

Monday, August 3, 2009

Home Again

I have returned from my job in Georgia. I was excited about making a trip to operate Mike's layout but the traffic got me. Trying to get up 64 from Chesapeake on Saturdays is a no win situation. Spent the rest of the day adding more scenery base to the peninsula, and worked on the truss bridge abutments. Pictures to follow.

Wednesday, April 8, 2009

Deck Truss Bridge Work Complete


I whipped up this deck truss bridge over the last few days. Tonight I cut out the spline roadbed where it is going in, I will build and install the bridge abutements and have it permanently installed by the end of the weekend.......I hope.

Tuesday, March 31, 2009


Next bridge on the construction schedule is to span this large gap where a river will be. It is fairly high and I am holding up a warren truss section from a central valley kit I built some years ago that was destroyed during my last move. I will use these same components to scratch build the mid section here. the track has a curve at each end as it crosses the river so I will have to build some plate girder deck sections on each end.

Cement Plant


The cement plant with the main large structures in position. I still need to scratch build the kiln, machinery tower for the other end of the kiln, storage building, coal unloading shed and all those conveyors running here and there. The grain elevator is being used for this cement plant since the building architecture is similar for both industries.

Monday, February 2, 2009

Talc Plant Mockup


I have placed the structures I am planning on using for the Talc Plant. However I think they are overpowering the area. It is the height that is bothering me. I was planning on kitbashing/scratchbuilding this industry anyway so a complete build from scratch may be what I have to do.

I would appreciate some observations from those who view the blog.

Thursday, January 29, 2009

Bridge Installation Update


Here the deck bridge has been installed and the scenery base has been added around the bridge abutements. I used the scenery base formula that Joe Fugate developed on his Siskiyou layout and explains in his modeling video set. Again this is a first with me. I have used the more traditional hardshell over the years. This technique takes some getting used to, but it does make a good solid base and it covers quickly. The link to the video series site is on my favorites list if you are interested.

Sunday, January 25, 2009

Redesign of B&M Junction


I took out the B&M junction that consisted of a switches hidden in the back left corner of the closet, a crossing and inverted wye that I fit in when I laid the track hoping to have a dynamic junction in which a B&M train came out of staging to swap cars in the interchange and then would head back to staging. I have operated trains over the Junction and felt that once scenery was installed and the switches where out of reach, except for ducking under the layout, that it was going to be less than reliable. Although I had only had an isolated derailment in the area, as many of you know once access was limited Mr. Murphy would rear his head. The hidden switches were removed and a simpler junction was put back in close to the original plan it will be used to move cars on and off the layout between sessions. New cars coming onto the layout will be spotted before an operating session and cars headed off will be removed after the session.

The left track is a pulp wood yard, had to add this since I have so many scratch built pulpwood cars I spent time building.

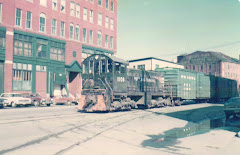
The center track is the mainline heading into Portland staging.

The two tracks on the right are the B&M interchange tracks.

Bridge Installation


I started the installation of the first bridge on the layout. After removing the existing track by cutting the rail to length, I sawed out the section of laminated roadbed where the bridge will go. After making two abutement backs, I installed the deck bridge structure. It is a simple Atlas deck bridge section with a microengineering bridge tie section installed on top ILO the Atlas snap track that comes with it. I then made the gaurd rails from code 70 rail and supper glued them in place. I will work on blending the scenery base into the bridge abutement. I will post again when that is complete. I am waiting on some material to complete the abutments.

Thursday, January 1, 2009

Additional Cars


This car was done using my own custom decals created for this scheme. The weathering is from a photo out of the MEC in Color book Volume II.

This is an old MDC car, after researching I determined the car and paint scheme are totally inaccurate for the cars number, still it looks good and after all it is my railroad.

Additional Cars - MEC Cement Hopper

Weathering Break


All of the covered hoppers in this image were weathered over the last day or so, I use washes, direct application of paint and pastels to create the weathering. I used to use an airbrush but have come to find I like the pastels better and feel I can create an appearance much closer to the actual look of the weathering in the photos of equipment. If I can find photos of the actual car type and paint scheme of the railroad I will use that to do the car. If I can only find the car type I will pick a photo that I like the weathering I see on the car and use it on the model.