Monday, December 27, 2010

Entrance from staging


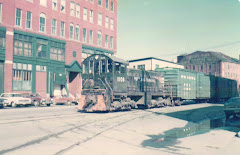
The staging yard is located in the closet and passes through a cutout in the wall. I worked this area up to look somewhat like the old Yard 5 tracks which were on the other side of Commercial street from Yard 8 the tracks ran between the hill that Portland was built on and several industries that by the 1970's were no longer served by rail or even in business. The tracks had a walkway and pipe bridge that passed over the tracks. I chose to put a pipe bridge to hide the cut and retaining walls and buildings. The building on the right will have the yard paved over the tracks for unloading building supplies. The loads will be concrete blocks , bricks and lumber that are received here. The building is a stand in for now that was used on a previous layout.

Yard 8 gets ballast

With a 4 day holiday I was able to put some time in on the layout, I ballasted Yard 8 and added a little grass in some areas.

Thursday, November 18, 2010

Working 12 hrs a day 6 to 7 days a week has meant little layout construction time. I did manage to get the track on the trestle and finish all wiring for track power, all that remains is connecting up the switch machines.

Sunday, September 26, 2010

Power is Back


I spent the day running bus wires under the bench work and then added the feeders to the Commercial Street Section.

I also built the removable section for the doorway before Vacation but never posted a picture. I will do the fianl track installation and power it next. This was my first time using the Woodland Scenics water. It took some of the paint from the base and made a very interesting murky water effect.

Tuesday, August 24, 2010

Electrical Hook Up

I had hoped to save re running all of the bus wire from the circuit bkrs to the layout. After connecting 20 + leads to the yard tracks I turned on the DCC system to test.

I did not test each section as I connected to the tracks and obviously there is something seriously wrong as all 4 block circuit brkrs tripped!

I should have tested each section as I connected them to the bus wires.

Sooooo, I guess the new plan is to pull all the bus wires completely out and run new wires to each circuit breaker protected block and connect 1 section at a time, test for problems and then correct if needed and move to the next section.

Did I mention this is the part of the hobby that I do not enjoy.

Sunday, August 15, 2010

Additional Pics from the Trip


The 216 was power for the Notch trip a five hour trip, 2 hours up, an hour at Crawford station and 2 hrs back down. Commentary was provided on history and railroad history through out the journey. The 573 was powering the valley trains it is in a MEC / B&M Maroon scheme from the early diesel years when MEC and B&M were operated jointly. This locomotive is the engine operated under the MEC and Guilford before being sold to Conway Scenic. The bottom photo is our train at the Crawford Notch station ready to head back down to North Conway.

Visit to Maine and stop at Steamtown


Liz and I took a vacation to Maine to visit family and do some sight seeing. Took many photos along commercial street of the remaining buildings, I visited a hobby shop where I picked up a MEC S-3 and an HH600. We rode the Conway Scenic up to Crawford's Notch and had a nice lunch in the dining car.

Of note was the 252 in a MEC inspired paint scheme, only the wording on the logo changed. The Logo was "CONWAY SCENIC The Notch Train Route". The engine that pulled the Notch Train was a high nose GP-35 #216 also in the MEC inspired Harvest Gold Scheme.

On the way home we stopped in Scranton at the National Historic Site Steamtown. I enjoyed that also, but it was too much walking for Liz and here sister. I ran around every where but will have to make another trip and go by myself to really explore.

We rode in Lackawanna passenger cars behind a ex-CN 2-8-2 #3254.

I was very impressed with both operations.


Tuesday, July 27, 2010

New Title

I decided to change the Blog title to more accurately reflect what I am modeling.

Wednesday, July 7, 2010

Staging

Plastic Pellet Plant Area

Commercial Street from the other end

Construction Update


Completion of the Commercial Street modules and track can be checked off the construction list. The harbor deck for building the wharfs is in and the module across the opening to the closet and staging is in. Only 3 more pieces left to complete bench work.

Tuesday, June 1, 2010

Work Progress Update

Over the holiday I managed to install the staging yard bench work and track. Built the lift bridge module and installed it (Yes I want the lift bridge more than additional commercial street trackage).

Sometimes you have information under your nose and never realize it. In order to install the bench work staging I had to clear out all the suitcases and other RR items stored in the closet. Included were several tubes with blueprints and charts from the Maine Central and a Map/Chart of all the PT trackage around Portland. WOW I had forgotten I had it. What is even more of note was that the chart lists every industrial customer that was served by the PT circa 1970! Each customer name is listed in association with the yard nearest the customer. I was explaining this little gem to my wife and how I had forgotten I had it when she made a great suggestion, have it framed and hang it in the room! I will do that and some of the other track charts would make great wall hangings if framed.

Thursday, May 20, 2010

Yard 8 tracks laid


My version of "Yard 8" is completed. Still much to do. Solder all joints, install tortoise switch machines on the main tracks, install ground throws on the yard tracks and wire all of it up.

I need to work on staging bench work the bridge and mill modules before laying any more track. With a whole weekend off I may be able to get that done and the other home projects on the honey do list.

Saturday, May 8, 2010

Work Update

Mounted the yard modules on benchwork, painted the surface and laid out track centerlines. Need to complete 2 more modules for the visble sections to be complete. Staging benchwork is next though before installing the module that runs across the front of the closet door. Last item to tackle is the bench work for harbor piers.

Saturday, May 1, 2010

Work Progress

I have been assembling the sections over the last week, only a couple of more to do. Keep vacillating about the lift bridge area and whether or not to keep it or make it more of Commercial Street. I will have to decide before I make that module as the bridge scene will require a cutout for the water section.

Friday, April 23, 2010

Commercial Street


The upper photo is midway down Commercial Street (East), the lower photo is where the street running began (West End).

Thursday, April 22, 2010

Track Plan


The tentative track plan. I will adjust the whole street running area as I layout the tracks. Any and all comments and suggestions are welcome.

Monday, April 19, 2010


The other side of the room, what is left of the benchwork where the peninsula was, soon to be 2 piers. The tracks will run along the wall and be street running modeled to have the feel of Commercial Street from when I used to roam it in the 70's. I will take specific details from that area and era and put them into the scene. More details to follow on that. Including my photos from the 1970's of Commercial Street.

The yard as seen from the door way.

P&R Redux


The new yard being laid out. I still need to cut the Homasote and mount it.There will be three through tracks on the left a 4 track yard, which you are looking down the ladder a through fare next to the edge and an engine facility off the through fare at the lower right. Three 4' x 18" Modules.

Friday, April 9, 2010

Disassembly Complete

All of the previous layout has been removed down to the benchwork! I have left all of the wiring intact and should be able to reconnect the leads to the new track when installed. The new layout will be built on 18" wide by 48" modules that will be mounted to the existing benchwork. The only other sections different from these will be the wharf module, staging module and the module across the front of the closet. Still need to scan the track plan for posting. Not traveling for work but that does not mean the hours are any shorter.

Wednesday, March 31, 2010

Lessons learned

If you are like me and change your concept or idea often, never glue the track to the roadbed. I will always spike it from now on. Used liquid nails to apply the track to the corak roadbed, next to impossible to remove with out damaging track. I am glad I spiked all of the switches as they are easily removed for reuse.

Foam core scenery support is great until you tear it out, what a mess. Cardboard strips and plaster cloth only from now on.

Less is better, less area to scenic especially. I had only partially sceniced the peninsula and it was a real time consumer and material consumer. This next design will have the shelves as narrow as possible to fit the track work flats against the back drop and smaller structures if any between the bench edge.

Using linoleum for the back drop is great if it is not to high. I had used 2-1/2 foot high sections of linoleum for my back drop. It was hard to install and keep flat against the back board. As time went by its weight started to pull away from the back board. I would only use it up to 1 ft high if I ever use it again.

Layout is 50% dismantled as of today.

Wednesday, March 24, 2010

Uh Oh things are going to change

Yep, I have determined I am not happy with what I designed (AGAIN). So have been sketching and have come up with a new plan. I hate the hidden staging and kinda of knew I would at the start but went ahead with the design.

New design will use existing benchwork but will be based on a Portland Harbor/Commercial Street theme. I am not building to the actual layout of the real life area but am using different scene themes based on the prototype area.

Will start dismantling the existing layout track work and upper bench work over the next weeks.